
【活动】:会员128元永久会员早开早划算!

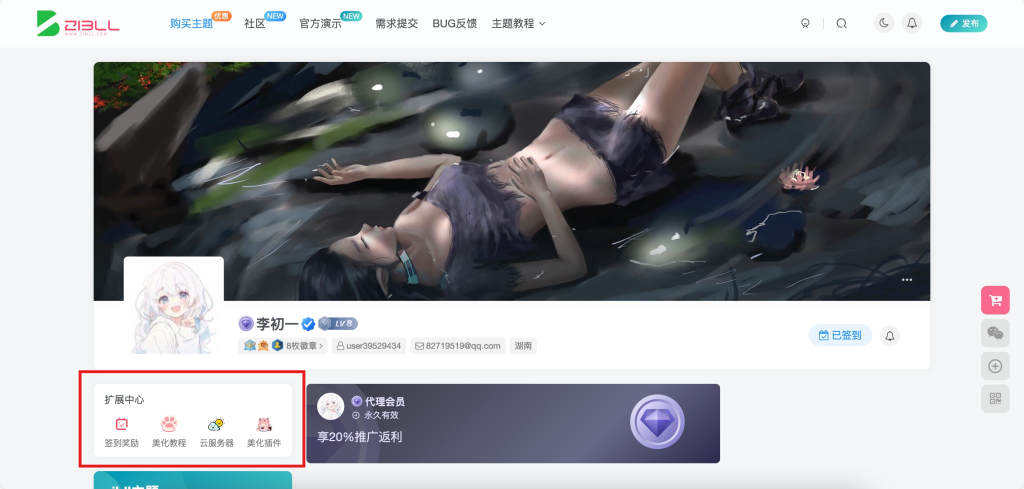
演示图片

教程介绍
前段时间有人在问用户中心的扩展入口是如何添加的,我也稍微研究了一下并且仿出来一个插件,不过只有这一个功能还不值得发在社区里面进行分享,等我完善更全面的时候再给各位进行分享,下面教大家如何使用jq在用户中心侧边栏添加这个扩展中心
首先需要编写好你需要插入的html模板,下面我给大家一个插入示例:
$(function(){
    $('.col-sm-3 .sidebar-user').prepend('<div class="zib-widget padding-6"><div class="padding-6 ml3">扩展中心</div><div class="flex ac hh text-center icon-but-box user-icon-but-box"><style>.zyx-item {width: calc(25% - 10px);margin: 5px;min-width: 50px;max-width: 100px;cursor: pointer;}.icon{width: 1em;height: 1em;vertical-align: -0.15em;fill: currentColor;overflow: hidden;}</style><a class="zyx-item" href="javascript:;" data-remote="https://www.51ckp.com/wp-admin/admin-ajax.php?action=checkin_details_modal" data-class="modal-mini full-sm modal-dialog" data-toggle="RefreshModal"><div class="em14" style="color:#777"><img class="icon em12" src="https://www.51ckp.com/wp-content/uploads/2024/01/签到有奖.svg"></div><div class="px12 muted-color mt3">签到奖励</div></a><style>.zyx-item {width: calc(25% - 10px);margin: 5px;min-width: 50px;max-width: 100px;cursor: pointer;}.icon{width: 1em;height: 1em;vertical-align: -0.15em;fill: currentColor;overflow: hidden;}</style><a class="zyx-item" href="https://www.51ckp.com/"><div class="em14" style="color:#777"><img class="icon em12" src="https://www.51ckp.com/wp-content/uploads/2023/12/cat.svg"></div><div class="px12 muted-color mt3">美化教程</div></a><style>.zyx-item {width: calc(25% - 10px);margin: 5px;min-width: 50px;max-width: 100px;cursor: pointer;}.icon{width: 1em;height: 1em;vertical-align: -0.15em;fill: currentColor;overflow: hidden;}</style><a class="zyx-item" href="https://www.byvps.cn/aff/XFWUTIUX"><div class="em14" style="color:#777"><img class="icon em12" src="https://www.51ckp.com/wp-content/uploads/2024/01/多云.svg"></div><div class="px12 muted-color mt3">云服务器</div></a><style>.zyx-item {width: calc(25% - 10px);margin: 5px;min-width: 50px;max-width: 100px;cursor: pointer;}.icon{width: 1em;height: 1em;vertical-align: -0.15em;fill: currentColor;overflow: hidden;}</style><a class="zyx-item" href="https://www.51ckp.com/pay-plugins"><div class="em14" style="color:#777"><img class="icon em12" src="https://www.51ckp.com/wp-content/uploads/2023/09/041.png"></div><div class="px12 muted-color mt3">美化插件</div></a></div></div>');
});
只需要将上述代码放置于后台的自定义javascript代码内即可实现在用户中心侧边栏插入一个扩展入口
插入代码:
$(function(){
    $('.col-sm-3 .sidebar-user').prepend('这里面放你的html');
});
实现原理:
这段代码是一段使用 jQuery 编写的 JavaScript 代码
主要用于在网页上动态地添加一些元素
具体来说,这段代码的功能是在具有 .col-sm-3 .sidebar-user 类的元素内部添加一些链接(<a> 标签)
每个链接都有一个描述性的图标和文本
代码解析如下:
$(function(){ ... });:这是一个 jQuery 的文档就绪函数,意味着当 HTML 文档完全加载和解析完成后,里面的函数就会被执行。$('.col-sm-3 .sidebar-user').prepend('<div class="zib-widget padding-6">... </div>');:这一行使用 jQuery 的prepend方法在具有.col-sm-3 .sidebar-user类的元素内部的最开始处添加一段 HTML 代码。- 在添加的 HTML 代码中,有几个
<a>标签,每个都包含一个图标和一段描述性的文本。这些链接被添加到一个名为.zib-widget的 div 中,添加zib-widget的目的是调用子比主题小工具的css
值得一提的是,在很久之前我所发布的头像框代码教程也是使用这种方式在头像之前添加一个头像框进行覆盖
也就是说只要你能够准确的表明需要插入内容的css,这段代码就能够将你所编写的html插入其中
代码内的prepend也是支持更改的,prepend的含义是在选中的div内部插入
你也可以修改为after、before、hover等
其中after为在区块后面插入
而before则是在区块前面插入
hover这个更是老演员了,悬浮时显示
大家可以参考我的代码自行修改内容,不过html代码需要压缩后才能够放在里面

感谢您的来访,获取更多精彩文章请收藏本站。

© 版权声明
THE END


暂无评论内容